Pages

Let me off the grid! A journey toward artful, holistic living in the middle of Sin City...

A journey toward artful, holistic living in the middle of Sin City...

Monday, January 28, 2013

Around the Farm...

Frankenfoot is all healed on the outside and feeling pretty good.
Inside, there is still some swelling around the joint and it lets me know when I need to sit down for a while and rest.  I see the doctor tomorrow and hopefully he'll tell me I'm not overdoing it.

Strawberries in abundance from Bountiful Baskets! Over the past two weeks I got 16 pounds of them.  I put up 8 pints of strawberry jam,

and dried 12 pounds of them in my dehydrator.
It's amazing how they shrink down to nothing...

I've been making some fermented things:  yogurt, sourdough starter, and creme fraiche.  It all sounds very fancy but it's stinkin' easy.
strawberry yogurt, sourdough starter, creme fraiche
In fact, there's no reason to buy sour cream when you can make creme fraiche in 24 hours.  Get a pint of heavy cream (whipping cream) - NOT ultrapasturized, and dump it in a bowl.  Add 3 tablespoons of buttermilk and gently whisk into the cream.  Put a clean cloth over the bowl (I use cheesecloth) and leave it for 24-36 hours.  Our house is chilly in the winter, so it takes a little longer.  When it's thick, it's done.  Put a lid on it and stick it in the refrigerator.

Yesterday I worked in the herb garden, building up the bed and making a (hopefully) dog unfriendly border using some paving stones that have been lying around for ages.  I also transplanted my bay laurel tree from a container into the ground.  This morning I'll plant some peas, nasturtiums, and calendula seeds. (Or maybe not.  I just went outside and it's freakin' cold and windy.)
Murnie checking out the new border.
At the back of the garden, you can see my upcycled bowling ball.  Here's a close up:
I got the idea for it on Pinterest here.

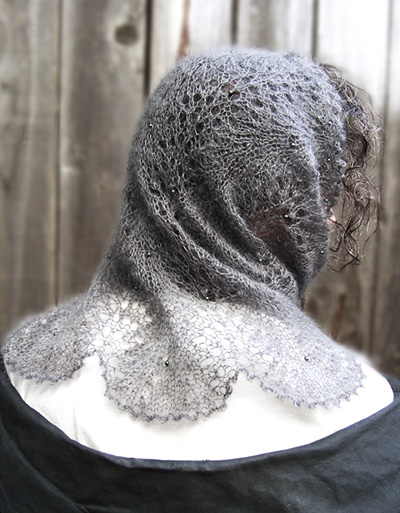
Remember the lace wimple I blogged about a while back?  Well, I got busy with it...
and now it's finished! I learned a lot by making it - provisional cast on, how to add beads to your knitting, and a picot bind off.


I must remind you that I am neither a professional model nor a professional photographer...

So while some of us are buzzing around doing a million and one things, others of us are just lying around taking it easy...

Murnie the Dog
Rosko the Chihuahua
Sophy the Cat

Nelly-cat

Tuesday, January 22, 2013

Upcycled Envelopes, or Art Materials in Your Mailbox!

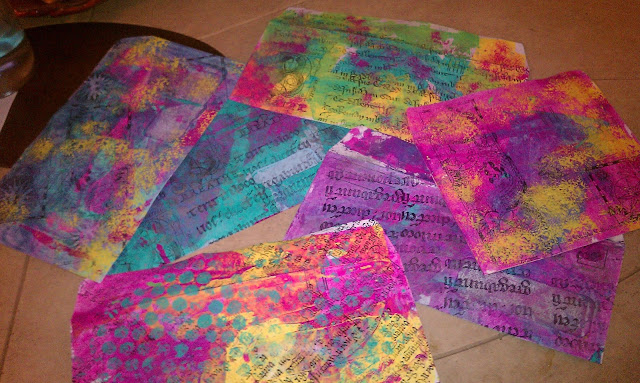
I love to write letters.  And I love to make art.  This project combines the two, plus adds a little bit of sustainability, which is the whipped cream and cherry on top.  You know all that junk mail you still get, even though you've put yourself on every "Do Not Mail" list in existence?  Well, this is where the free art supplies come in.  Don't just throw that junk mail away - open it up and pull out any return envelopes they may have sent (and any plastic "pretend" credit cards).  Keep those and put the rest of that mess through your shredder.  On your next trip to the compost pile, dump in all that shredded junk mail because it adds "brown" or dry material to your pile.  This is helpful to us because there aren't a lot of leaves in the Mojave Desert.

Now, here's what you need for this mini-project:

Unused return envelopes; acrylic paint - any kind, cheap stuff from Michael's or JoAnn's is fine; an old credit card or gift card; rubber stamps, a stamp pad (I use black because it shows up better through the layers of paint).  Oops! not shown: some bubble wrap, a brayer and/or a piece of sponge. These are optional.  You DON'T need a bowl of walnuts or a nutcracker.  Unless you get hungry.

Step 1:
 Begin by putting two small drops of paint on the front of your envelope.  Make sure they're small, or you'll get paint all over.  You can always add more. And if you have too much, you can put it on another envelope that's close, so really, no worries.


Next, use that old credit card/gift card to scrape the paint over the front of the envelope.
They are THE BEST paint applicators I know of.  Plus, when you reuse them you're keeping stuff out of the landfill.  You don't have to use two colors at the same time; you could apply one,
 let it dry, then apply a second color:

Be sure to do the fronts and backs.


Now eat a couple of those walnuts while you're waiting for your envelopes to dry...

After they're dry, stamp random patterns all over the front and back of your envelopes.

Your envelopes are beautiful and could be used right now.  All you need to do is add a label for the address and it's good to go.  BUT if you want to add a little extra pizazz, here's the optional step:

Using a contrasting color (I like metallics, but I'm just that kind of bear), brayer a little paint onto the bumpy side of the bubble wrap.


And press it randomly over your envelope.


Or, if you'd rather use a sponge, tap it into the paint and gently tap over your envelope however you please.

And there you are.  Welcome to mail art!.  Now, clean up your workspace and go write some letters...


This post has been linked to Homemade MondaysFrugal Days, Sustainable Ways

Thursday, January 17, 2013

Frankenfoot, a finished project and the amazing cleaner recipe

Here is Frankenfoot, 12 days after surgery.  I am pleased, my doctor is pleased, my foot is relatively pleased.  I can now wear a real shoe, but have to be careful that it doesn't rub too much on the top of my foot, which = PAIN.  Murnie the Dog and I have walked twice around the path at the park (1 1/3 miles) for the past two days, but by the end of it we're both ready to go home and sit/lie down.

sorry for the poor color - it's my phone camera


Here is the finished forest green wimple.  It's really warm and light to wear either as a neck "scarf" or
a head warmer!  Amazingly simple to make, too.

dweebie looking model - it's hard to look stunning while managing the camera phone...


Yes, those are snowflakes and poinsettias left over from the holidays.  I have a hard time letting go...


I said I would post the recipe for the cleaner I used to clean my daughter's bathroom if it gave satisfactory results, so here it is:

1/2 cup Borax
1/2 tsp liquid soap (I used Dr. Bronner's peppermint liquid castile soap)
2 tsp. TSP (trisodium phosphate - you can find it at a hardware store.  I got mine at my local Ace.)

Swish this all around in 2 gallons of warm water.  It did the trick on the bathroom mold/mildew.  Big happies and results without the use of noxious chemicals.   

I got this recipe from a book called Nontoxic, Natural, & Earthwise by Debra Lynn Dadd.  I just checked and it's available on Amazon even though its copyright date is 1990.  Shouldn't I get a kickback from Amazon for referring you there?  How do you do that?

Monday, January 14, 2013

Preparing for spring

Looky, looky - something to do with all the empty toilet paper rolls I can't seem to bring myself to throw away!  I found the idea on Pinterest here.  This is my stupid-simple tutorial (like you couldn't figure this out by yourself...)

You need these:
Cut the tubes in half.  No, don't measure them (unless you're that kind of bear), just eyeball it.  Then, squish in half one way...


Squish in half the other way...


Use the fold lines as a cutting guide to make 3/4" (or so) cuts:


Bend the flaps in toward the center,


Then overlap them like you are closing the top of a cardboard box:


Pretty cool, yes?  Now to plant some seeds.  I think tomatoes, since they need a real head start here.


Meanwhile, here's how things are looking in my herb garden...

I've had to bundle everyone up the past few nights due to overnight temperatures in the 20's.  Brrrr....
Snoozing under the blankets are my dwarf lemon tree, lavender bush and rosemary bush. What's going on in your garden?


This post has been linked to Homemade Mondays, Week 11.  Many cool ideas - check it out!

Saturday, January 12, 2013

Presenting: Homemade Deodorant!

I have not been a fan of commercial deodorants/antiperspirants for a while (scary chemicals), but I also don't want to be a big stinker.  So after a bit of research, I decided to create my own deodorant out of ingredients that I can pronounce.

The result is a clean smelling cream that I'll be "test driving" for effectiveness.  I found most of my inspiration from two sources (A Sonoma Garden and Angry Chicken).  Both sites give complete directions, but I'll give you my ingredients list because I tweaked it a little.

Mama Bee's Homemade Deodorant                 
3 T. shea butter
3 T. baking soda
2 T. arrowroot powder
2 T. cocoa butter   
2 vitamin E oil gel capsules
13 drops of lavender essential oil
1/4 tsp. tea tree oil
1 T. vegetable glycerin

Basically, you put the first four ingredients into a glass Pyrex measuring cup and microwave at 30 second intervals until melted.  Stir well to mix.  Then add the last 4 ingredients and stir well (no more microwaving).  Pour into a sterilized (boiled in water to cover for 10 minutes) half pint jar and put in the fridge until it's solid-ish.  Take it out of the fridge and leave it on your bathroom counter (no one wants frozen pits, especially at this time of year!).  Hurray!  No more nasty chemicals.

This post is linked to Homemade Mondays.

Friday, January 11, 2013

Never do your daughter's laundry and other recipes...

I swore off doing my daughter's laundry when she was 13, but when I walked into her bathroom yesterday and saw what a health hazard it had become (we're talking heavy duty mold and mildew here - like how could she not be terrified that something was going to reach up and grab her ass when she sits on the toilet?!?),  I decided to take matters into my own hands.  Out came the ton of dirty clothes and into the washer.  Unfortunately, I didn't find the tube of concealer she had in a pocket until it had gone through the washer and dryer and melted all over all her black jeans.  (One of the many reasons I swore off doing her laundry 7 years ago.) I'll let you imagine the words that came out of my mouth because anything you can think of is probably on the list.  This morning I created Mama Bee's super stain remover and crossed my fingers.  And...it worked!  So easy, too.  Like the modern equivalent of dragging your laundry down to the river and pounding it on rocks for hours.  Stop laughing.  I'm not kidding.  But it worked.  And my daughter will never know that I screwed up her entire wardrobe of black jeans.

So here's what I used:
1 tablespoon Borax
1 tablespoon Washing Soda
1 good squirt of Dr. Bronner's liquid peppermint castile soap (I imagine any flavor will work)
1 quart (guessing) of hot as hell tap water

Swish it around until the stuff dissolves.  I used a natural bristle nail brush, saturated the stains and scrubbed the crap out of them.  Then I put them back in the washer with my homemade laundry soap and dumped the rest of my "miracle stain remover" in for good measure.  Just pulled everything out of the dryer and the stains are all gone. May the cleaning gods be praised because I was NOT interested in buying 5 new pair of jeans...

Now I have to figure out that nasty bathroom.  I will be concocting another cleaning formula and will let you know if it works.

So as I was lying in bed last night, unable to sleep because my monkey mind wouldn't be quiet, I debated the idea of getting up (at the risk of waking the husband who had to get up in just a few hours) and making myself some Faerie Wine.  This is something I used to make for my daughter when she was little and couldn't sleep.  I eventually fell asleep without it, but next time I believe I'll just sneak down quietly and enjoy a cup.

Faerie Wine
Warm 2 cups of milk in a small pan - do not boil. Stir in 1/2 tablespoon honey and 1/2 teaspoon vanilla.  Pour in a cup and dust with cinnamon.  Sweet dreams!

We are great fans of morning porridge here.  This morning I woke up thinking about Caudle, a recipe I used to make for SCA events because it is an authentic old recipe.  There were several moments of panic when I couldn't find the recipe, but AHA! there it was in the bottom of a trunk of SCA stuff.  I immediately made some for old time's sake.  Here it is:

Caudle
1 c. oats
2 c. milk
1/4 tsp. salt
2 eggs
2 T. butter
1 tsp. vanilla
2 T. honey
Measure the milk and salt into a saucepan and heat slowly.  Allow it to come to a simmer, not a boil, before stirring in the oats.  Simmer on low heat for 6-7 minutes. In a small bowl, beat the eggs until yolks and white are well mixed together. Add 1 T. of the oats to the eggs and mix. Then slowly mix in an additional 2 T. of oats.  Now slowly pour this mixture into the oatmeal, stirring constantly for a couple of minutes.  Add the butter, vanilla and honey. Stir until the butter is melted.

I know what you're thinking.  "What's going on with the art stufio?"  Yeah, well...I worked on it for a couple of hours yesterday and will venture in again today.  This is something that's going to take a number of days.  I did empty three boxes and find a bit of the floor, so that is progress.  Not enough to warrant a picture, though. 

Time to deal with that bathroom... 

Wednesday, January 9, 2013

EEEEWWWWWW

I went to the doctor yesterday for my post op check up.  Off came the bandages and...

it's FRANKENFOOT!!!  Yeah, my foot is GREEN.  And you can see how long the incision is.  But the upside is that there's no pain and no swelling.  My doctor was amazed.  We had a little mutual admiration moment - I said it was because he is such a good surgeon.  He said it was because I followed his directions and took such good care of myself.  Probably it was a lot of both.  

Anyway, I am cleared to drive and now begins the painful process of keeping the joint moving so it doesn't freeze up.  Not the most pleasant feeling, I can assure you.  But at least I'm no longer confined to the couch.  Not digging in the garden yet, but swimming in a week and a half (once the incision is healed completely).

And now for even more  horrifying pictures...I walked into my stufio this morning looking for address labels and found this:

                                   O. M. G.  What the hell?!?

OK, it's awful.  I'm ashamed.  But by posting these pictures I have made public my personal challenge to get this mess cleaned out so I can get back to making art.  Please tell me that your art room has looked this bad at one time or another.  Please.  Even if you're lying.  Make me feel better.

I have eight weeks off before I have to go back to work.  Surely I can do it in eight weeks, right?  Say yes.  Please.  Even if you really think it's a lost cause and my room should be condemned.  I can't see you snickering behind your hand.

On a happier note, my homemade vanilla is coming along nicely.
I learned how to make it from Sarah at Frugal by Choice, Cheap by Necessity.  She's got a great blog.  Check it out if you have a moment.

Finally, in my last post I mentioned that I was going to make orecchiette and sauce from scratch.  It turned out to be soooooo delicious that it deserves a post of its own along with the recipe.  Coming soon.

Off to figure out where to begin with that god-awful mess.  If I don't reappear in a couple of days, please call the National Guard.  Tell them to bring their hazmat suits...

Monday, January 7, 2013

Repurposed Cards

As promised, here is a picture of the basket I made from this year's holiday cards:
While I was blanket stitching around the pieces, I kept having a sense of deja vu.  I know I haven't made one of these before, but it felt so familiar.  (Could it be the mysterious D.A. vibe again?  Naaaawwhh - can you really imagine Lady Mary making one of these?)  Anyway, I think it turned out to be something cute and I got the idea for it and the snowflake thingy (see previous post) here.  I'd like to try one of the burlap wreaths they show in their December/January issue. 

This afternoon I plan to make Orecchiette with Sausage, a recipe from an ancient issue of Tastes of Italia magazine (I think November 2006 qualifies for ancient).  It looks pretty simple to make and the husband deserves a nice dinner since he was back to school this morning and I have the next 8 weeks off with my foot.  I haven't attempted home made pasta, but this looks like I can do it with minimal time on my feet...

Sunday, January 6, 2013

My Left Foot

This is my foot.  And David's chihuahua, Rosko.  He's a nice chihuahua and he likes everybody, but he LOVES my husband.  This is his coy pose.

My foot is tired of looking like this.  I suppose I shouldn't complain.  I'm fairly mobile considering I had surgery on Thursday morning and it's Sunday afternoon.  Pretty much done with the pain pills, which were not fun.  I have to creep along whenever I get up for fear of bumping it - also not fun.  I see the doctor on Tuesday.  Hopefully I can lose some of the bandaging, which is tight and itchy.

Here is my faithful companion, Murnie:
She's a snuggle-bug and has much taken up residence on the couch with me.  We receive occasional visits from the cats, when they're not at Secret Cat Club meetings or napping or getting into things that I don't know about because I am stuck on the couch...

Here is a weird snowflake thingy I made from some of the cards we got this year:
Yep. That's what I did for two days while lying on the couch, high on percocets watching Desperate Housewives on Netflix.  (Thank goodness Downton Abbey starts back up tonight.)  I've also got pieces cut out to make little baskets from the cards that were too small for the snowflake thingy. Pictures to follow once I get going on it.

While haunting the internet I discovered this:


which I love SO much and want to make.  It will have to wait for a few more days because I have to be able to get up and root around in my stufio for the yarn, needles and beads.  Isn't it gorgeous???  For those of you who knit, you can find the pattern here.(Even if you don't knit you can find it there, but you probably aren't interested.)

I'm finishing up a wimple knit from a deep green Shetland wool.  It's not delicate like this one, but it is WARM.  And I like the color - a foresty kind of green. 

I also have some pillowcases that I'm going to embroider (white on white).  I planned to have a bunch of fussy little stuff to work on because the coffee table won't hold big projects and I have to be able to work on things while lying down.  I'm not sure why the pillowcases.  I just woke up one morning last week and wanted to have elegant embroidered pillowcases.  Perhaps it's the Downton Abbey vibe, not sure...

Enough nattering for now.   More on the next episode of  "View from the Couch..."