Pages

Let me off the grid! A journey toward artful, holistic living in the middle of Sin City...

A journey toward artful, holistic living in the middle of Sin City...

Monday, June 17, 2013

The Viking Chickens

On May 1st, I purchased two baby chicks from our local CAL Ranch store.
Baby Bela

Baby Fleck
They were horribly cute, as you can see.  The chicks lived for several weeks in a large tub on our balcony, away from our four-footed creatures (two cats and two dogs).  It was amazing to see how quickly they grew.  After a time, I began to worry that they were over crowded and I needed to arrange a larger space for them. I purchased a small coop that was raised on legs and surrounded it with chicken wire attached to 6-foot stakes.  It was serviceable, but pretty ugly (not that the chickens cared, but I did), and I didn't even take a picture of it.  However, I did take a picture of the babies when they figured out how to walk up the ramp to the coop:
Bela and Fleck, 4 weeks old
After looking at numerous chicken coop plans, pictures and sites, I remembered that I had two Viking A-frame tents in storage, left over from my days in the SCA.  So Memorial Day weekend was spent building a coop and run for the little chick-a-bees.
The Viking chicken coop
While a professional carpenter would take one look at this and roll her eyes, I'm pretty proud of it and it has withstood the tests of the chihuahua, dachshund, tabby and ginger cats.  Since the heat has arrived with a vengeance, I have the run covered with shade cloth and a mister directed into the run.  Both keep the inside temperature below 100 degrees, even when it's 115 outside.  I planted a jasmine between the run and the wall in the hopes that it will eventually vine over the run, providing sweet smelling shade.

The "babies" are now 7 weeks old and looking more and more like real chickens:
Bela and Fleck
They get to free range the back yard every day, but stay close to their Viking mansion.  Often they only come out for a few minutes and then go back inside.  I guess they know where home is.

When I bought them, they were labeled as Araucana chickens, but after doing some research, I have my doubts.  Araucanas do not have tails, and these girls definitely have tail feathers.  Perhaps they are Ameraucanas or Easter eggers.  I guess we'll see once they begin to lay eggs...

Thursday, June 13, 2013

Wow.

I haven't blogged since February?  Really? Wow.  So much time gone by.  So much stuff happened. Foot surgery. Huge garden. Chickens. Viking chicken coop/run. Summer vacation.  Too much to talk about in one post.  So here's what I did today:
I reclaimed our fountain and this little corner bed that was awful to look at for too long.  Now it's a lovely goddess shrine.

I also cleaned off the courtyard altar, which had gotten pretty grungy and rededicated it to the element of fire (seems appropriate because we've been in the triple digits for the past two weeks. I mean, like 110 - 115 degrees kind of triple digits.  Awful!)

And since we've been feeding 2 or 3 stray cats who come to visit our yard, I made a nicer place for them to eat:
So that's pretty much what I've been up to today, aside from making popovers and sun tea and unloading some stuff through our local freecycle.com group.  I'll blog about the Viking chickens in the next few days...

Monday, February 25, 2013

I Built a Greenhouse!

Yep, I did. It's 4' high, 5' wide and 10' long.  And it didn't take too long, either.  It would have taken less time if I'd followed the directions here but of course I had to modify things...


It's made with PVC pipe and plastic sheeting.  Pretty easy IF you know what you're doing, which I did not.  But I figured it out anyway.
I needed to make three of these hoops:
It's a really good idea NOT to knock over the can of primer and get purple gook all over the work area like I did.  Grrr.  It's also a good idea if you're modifying someone else's plans that you need to think things through completely, which I thought I did but obviously did not because when I put everything together, I hadn't reckoned on bracing the longer sides.  I did not take a picture of that small disaster, but trust me, it was not pretty.  Back to Home Depot for another length of pipe and then:
Ta-DA!!! Thank the gods for zip ties.  What a marvelous creation.

Then things got really exciting because the wind kicked up as I was trying to wrestle with the plastic sheeting...
This is as far as I got and then decided to quit because the wind wasn't going to.  The very next day I had at it again, and
Success!  It gets pretty toasty and my seedlings love it.  I bought an inexpensive thermometer to put in there and found I had to open the plastic a bit because it was 90 degrees inside after just a couple of hours!   It's not beautiful to look at, but it IS functional.

I wish I wasn't so dumb about building things. I'm sure it takes me twice as long just because I have no experience.  But I figure I learn something with every project, so perhaps in 10 years I'll be able to zip through stuff like a pro...

This post is linked to Homemade Mondays

Sunday, February 10, 2013

Freezing Cooked Grains

I love grains, but they take so long to cook that I don't make them often. I stopped in at Trader Joe's last week and got to taste their frozen grain side dish.  It was very good, but the package only contained two servings, cost $2.99 and came in a mylar-ish bag that I didn't want to have to throw away.  So, after some internet research, I discovered that you can freeze cooked grains and then either microwave or put them in a pan with a little water and heat and they're as good as freshly cooked.  Why should I pay that much money for so little (plus yucky packaging), when I could make lots myself  for little money and my own reusable packaging?  I stocked my freezer this weekend.  Here's what I did:

First, I cooked several different kinds of grain (separately, because of course they all had different cooking times),  I used barley, brown rice, red rice and red quinoa because that's what I had.
I lightly greased my cupcake pans with coconut oil and packed each cup with the grain mixture.  I pressed it in with the bottom of a measuring cup so the grains would stick together.
Then I put them into the freezer.  Once they were frozen, I flipped the pans over onto a cookie sheet and popped the grain "cakes" out.
Put those little guys into a freezer bag and now I have individual serving sizes that I can pull out and heat whenever I need them. I love finding frugal ways of getting what I want!

This post has been linked to Homemade Mondays

Monday, February 4, 2013

Balsamic Pomegranate Green Beans


I discovered this marvelous recipe on pbs.org of all places!  We were blessed with green beans from the co-op this weekend and I was so pleased with how quickly this comes together.


Balsamic Pomegranate Green Beans

1 lb. fresh green beans, trimmed
1/3 c. balsamic vinegar
2 T. olive oil
¼ c. fresh pomegranate seeds
¼ c. crumbled feta cheese
2 T. chopped walnuts

Bring a medium pot of salt water to a boil. Add the beans and cook until bright green and tender, but not soft, about 4-5 minutes. Drain the beans in a colander. Quickly rinse the beans under cold running water and set aside.
Heat the balsamic vinegar in a non-stick sauté pan on medium high heat for 2 minutes.  The sauce should be the consistency of thick syrup. Whisk in the olive oil, and remove the pan from heat.
Transfer the beans from the colander to a large serving tray. Evenly sprinkle the beans with pomegranate seeds, feta cheese and the walnuts.  Drizzle the reduced vinegar all over the beans.  Serve it forth!

This post is linked to: Homemade Mondays

Saturday, February 2, 2013

Blessed Imbolc!

Bride's Bed 2013
May 2013 be fertile ground for all our endeavors.

Here is a recipe I like to make on Imbolc mornings (in fact, they are in the oven this moment):

The Best Scones (from the book Candlemas by Amber K)

2 c flour
3 t baking powder
1/2 t salt
2 T sugar
1/4 c butter
3/4 c milk
1 beaten egg

Preheat oven to 400 degrees.  Mix dry ingredients. Cut in butter. Mix in milk and eggs. On floured board, pat into a 1" thick circle and transfer to a baking sheet. (Or, if you're lazy like me, because it's too much of a hassle to drag out the bread board from the bottom of the cupboard, sprinkle flour on top of the dough and on your hands, scoop the dough out in one big mass and flip the floured side onto the baking sheet.  Gently pat it into the circle with floured hands.  There.  Wasn't that easier?  And you don't have to clean up the bread board or mess with trying to move a big circle of pliable dough.) Cut into 8 wedges but don't separate. Bake 25 minutes. Serve with butter, jam and clotted cream.

Later today? Candlemaking. Have a wonderful day!

Monday, January 28, 2013

Around the Farm...

Frankenfoot is all healed on the outside and feeling pretty good.
Inside, there is still some swelling around the joint and it lets me know when I need to sit down for a while and rest.  I see the doctor tomorrow and hopefully he'll tell me I'm not overdoing it.

Strawberries in abundance from Bountiful Baskets! Over the past two weeks I got 16 pounds of them.  I put up 8 pints of strawberry jam,

and dried 12 pounds of them in my dehydrator.
It's amazing how they shrink down to nothing...

I've been making some fermented things:  yogurt, sourdough starter, and creme fraiche.  It all sounds very fancy but it's stinkin' easy.
strawberry yogurt, sourdough starter, creme fraiche
In fact, there's no reason to buy sour cream when you can make creme fraiche in 24 hours.  Get a pint of heavy cream (whipping cream) - NOT ultrapasturized, and dump it in a bowl.  Add 3 tablespoons of buttermilk and gently whisk into the cream.  Put a clean cloth over the bowl (I use cheesecloth) and leave it for 24-36 hours.  Our house is chilly in the winter, so it takes a little longer.  When it's thick, it's done.  Put a lid on it and stick it in the refrigerator.

Yesterday I worked in the herb garden, building up the bed and making a (hopefully) dog unfriendly border using some paving stones that have been lying around for ages.  I also transplanted my bay laurel tree from a container into the ground.  This morning I'll plant some peas, nasturtiums, and calendula seeds. (Or maybe not.  I just went outside and it's freakin' cold and windy.)
Murnie checking out the new border.
At the back of the garden, you can see my upcycled bowling ball.  Here's a close up:
I got the idea for it on Pinterest here.

Remember the lace wimple I blogged about a while back?  Well, I got busy with it...
and now it's finished! I learned a lot by making it - provisional cast on, how to add beads to your knitting, and a picot bind off.


I must remind you that I am neither a professional model nor a professional photographer...

So while some of us are buzzing around doing a million and one things, others of us are just lying around taking it easy...

Murnie the Dog
Rosko the Chihuahua
Sophy the Cat

Nelly-cat

Tuesday, January 22, 2013

Upcycled Envelopes, or Art Materials in Your Mailbox!

I love to write letters.  And I love to make art.  This project combines the two, plus adds a little bit of sustainability, which is the whipped cream and cherry on top.  You know all that junk mail you still get, even though you've put yourself on every "Do Not Mail" list in existence?  Well, this is where the free art supplies come in.  Don't just throw that junk mail away - open it up and pull out any return envelopes they may have sent (and any plastic "pretend" credit cards).  Keep those and put the rest of that mess through your shredder.  On your next trip to the compost pile, dump in all that shredded junk mail because it adds "brown" or dry material to your pile.  This is helpful to us because there aren't a lot of leaves in the Mojave Desert.

Now, here's what you need for this mini-project:

Unused return envelopes; acrylic paint - any kind, cheap stuff from Michael's or JoAnn's is fine; an old credit card or gift card; rubber stamps, a stamp pad (I use black because it shows up better through the layers of paint).  Oops! not shown: some bubble wrap, a brayer and/or a piece of sponge. These are optional.  You DON'T need a bowl of walnuts or a nutcracker.  Unless you get hungry.

Step 1:
 Begin by putting two small drops of paint on the front of your envelope.  Make sure they're small, or you'll get paint all over.  You can always add more. And if you have too much, you can put it on another envelope that's close, so really, no worries.


Next, use that old credit card/gift card to scrape the paint over the front of the envelope.
They are THE BEST paint applicators I know of.  Plus, when you reuse them you're keeping stuff out of the landfill.  You don't have to use two colors at the same time; you could apply one,
 let it dry, then apply a second color:

Be sure to do the fronts and backs.


Now eat a couple of those walnuts while you're waiting for your envelopes to dry...

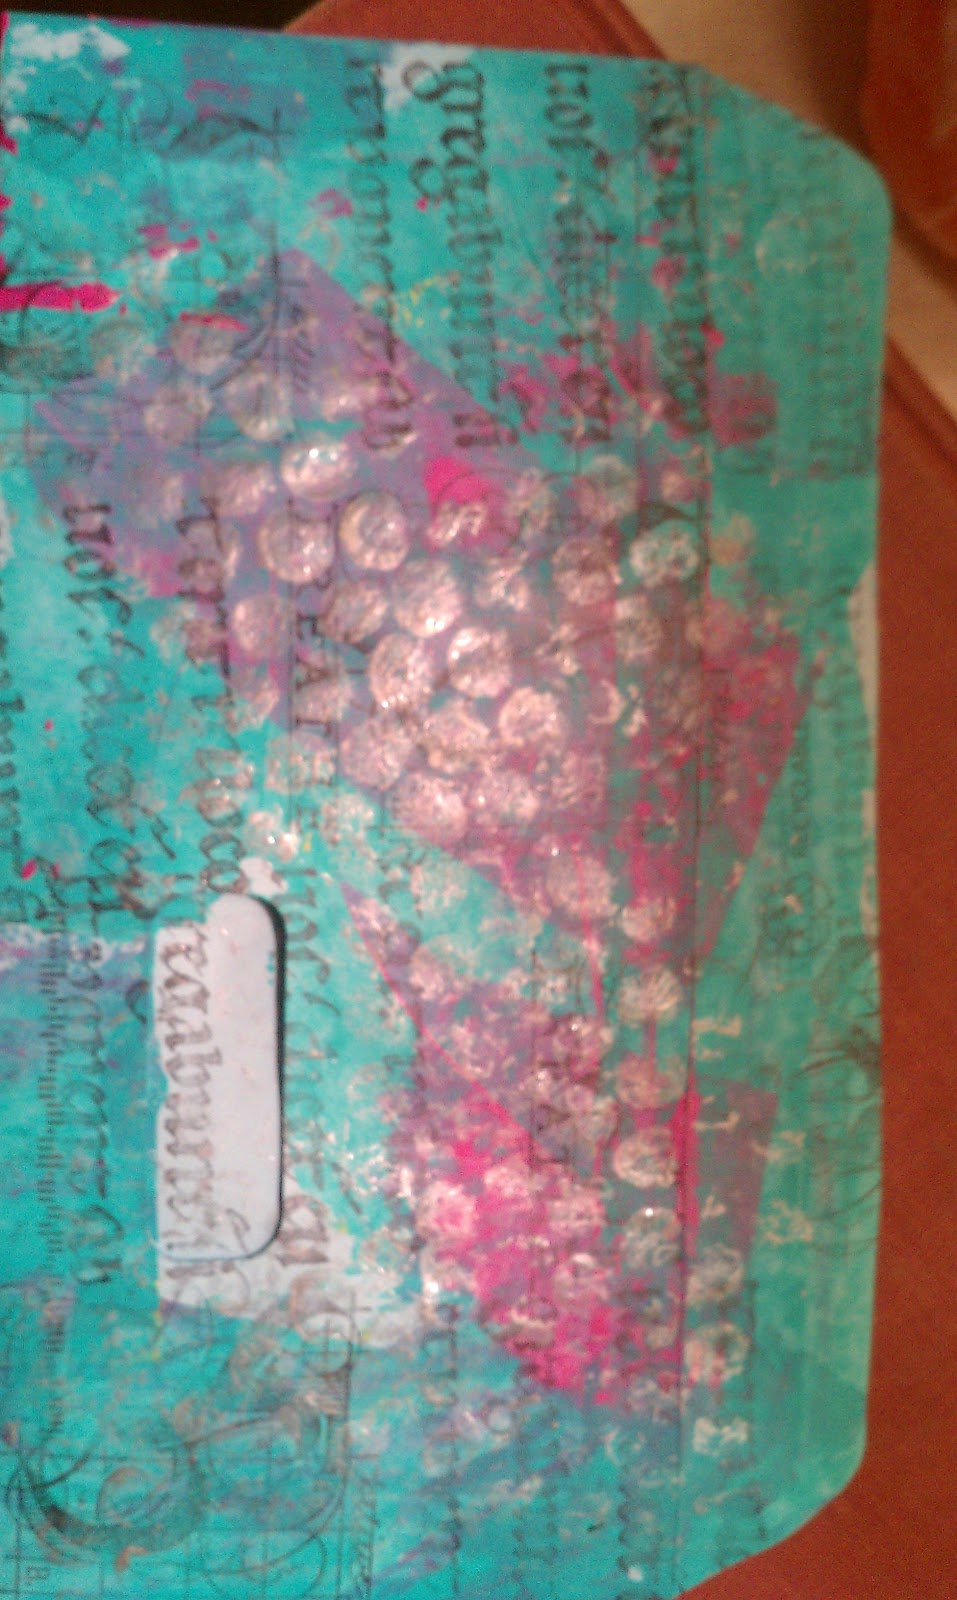
After they're dry, stamp random patterns all over the front and back of your envelopes.

Your envelopes are beautiful and could be used right now.  All you need to do is add a label for the address and it's good to go.  BUT if you want to add a little extra pizazz, here's the optional step:

Using a contrasting color (I like metallics, but I'm just that kind of bear), brayer a little paint onto the bumpy side of the bubble wrap.


And press it randomly over your envelope.


Or, if you'd rather use a sponge, tap it into the paint and gently tap over your envelope however you please.

And there you are.  Welcome to mail art!.  Now, clean up your workspace and go write some letters...


This post has been linked to Homemade MondaysFrugal Days, Sustainable Ways